Peter's z80.eu site blog
Search 

Please read ! 
If NO IMAGES will be shown, use www.z80.eu/blog instead of blog.z80.eu

Please note also - THIS BLOG ENDS HERE WITH THE LAST ENTRY FROM NOVEMBER 9th 2021.

I have prepared a new blog with wordpress at https://vintagecomputing.info !!!

Thank you.
Installing XENIX 386 on a real intel 486 PC Part 2 
Sunday, June 15, 2014, 09:00 PM
Posted by Administrator
Installing the XENIX 2.3.0d Development System isn't so hard.
Assuming you managed it to write six 1.44MByte floppy disk images back to real floppy disk media with success, you just have to enter 'custom' at the XENIX system prompt.
Then you have to choose '2' for Development System, '1' for installing one or more packages, and then 'ALL' for all packages. Be patient then, reading each disk will take a bit time.

Each disk contained a TAR file, which can be opened from any Windows machine with WINRAR also with ease (just open the image file of the floppy disk with WINRAR).

After all disks are processed, you have to enter the serial and activation code.
And last but not least, you have to decide what curses you want to use: termcap or terminfo based. Old skool people like me prefer termcap ;-)

After the system prompt reappeared, I tried to enter a small but famous test program.
But I could NOT enter the closing bracket '}' ... it's not available with my german keyboard. That's ugly, but because I had no time to figure out how to fix it, I just write the small text file in Windows, copied it to a floppy, and used 'doscp' to get the file into XENIX file system.

And it worked:

Remember - running the program without preceeding './' needs '.' to be added in PATH variable.
And without any cc option, the generated program is always named 'a.out'.

In one of the next parts, I will describe installing and using TCP/IP.

For a dev system manual, look at the related link below.

P.S.: I solved the problem with the german keyboard layout. You have to replace a file named 'keys' within the /usr/lib/keyboard directory with a modified version, then you have to run 'mapkey' one time. The modified 'keys' for my german keyboard can be downloaded >here<. If unsure, backup your original 'keys' file first before replacing it.
add comment ( 293 views )   |  permalink   |  related link   |   ( 3 / 11180 )
Installing XENIX 386 on a real intel 486 PC Part 1 
Saturday, June 7, 2014, 05:46 PM
Posted by Administrator
Well, sometimes you would like to try something you never tried before.
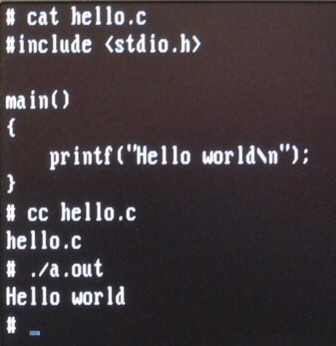
So after installing many times Linux on my newer PCs, I thought it would be fine to have Xenix 386 also installed, to play with it, or better, to compile some programs also (e.g. the "hack" game).
After I got the 7 Xenix floppy disk images (N1, N2, B1, X1, X2, X3, X4 for 3.5" HD media) from someone, I had to write the images back to real floppy disks first.

Unfortunately WINIMAGE does not know how to handle non-FAT formatted floppies.
Also, RAWWRITE (using real raw images) does only write tracks (sub)sequentially back, so if you write 720KB images back to a HD floppy disk, RAWWRITE generates junk.
So I decided to use my "disktool" I already used also for writing CP/M-86 disks.

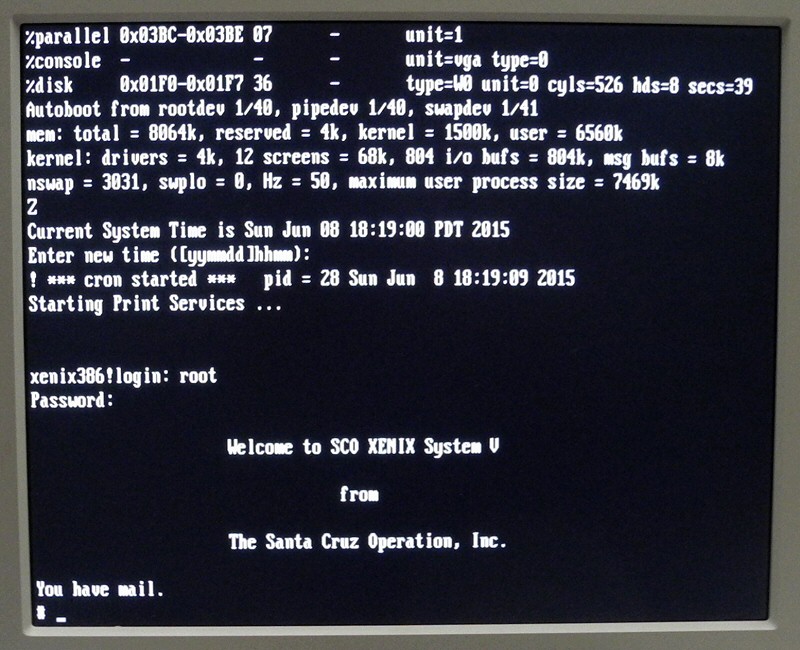
After this, I tried to boot from the N1 (the only one which boots)floppy disk.
This worked as intended, but after going on within the installation dialog, I recognized there should be non-used space left on your harddisk to create a Xenix Partition.
I wanted to have a DOS partition (1st Partition) and also a Xenix Partition (2nd Partition).
It was a bit strange because I thought I can "re-use" the already existing extended DOS partition, which I didn't used so far. No, I had to go back to DOS, start FDISK, and delete the logical and extented partition first. THEN I was able to go on, choosing "Create XENIX Partition".

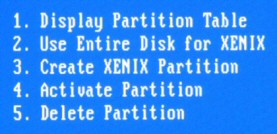
Btw. this was not really bad luck, because before I rebooted it for FDISK, I choosed to display the partition info within the Xenix installation dialog (and I remembered these numbers later on when creating the Xenix partition...).

Some uncommon questions raised then, after I was able to wrote the base/minimal system.
It asked me not only for a name of a non-american timezone (for me, CET), it asked me what parameters the timezone have, and what name the summer time has (? for me, it was always CET+1, but Xenix don't like to get a '+' in the name of the timezone).
My last floppy I had to insert, N2, had an error, and I got also a strange message "tar: tape read error".... I didn't used a tape, but on all other floppies except N1 just a single big tar file is existing. So I had to use another floppy disk, which was prepared in hurry from me again, too.

Then at the end, it asks me for a "link kit serilization". I didn't expected again such a question because I already typed in the serial number for the OS.
So I tried to enter the already used number again, and voilą, it worked ;-)

The whole installation (option 'ALL') occupied 13.3 MByte.
Very helpful also: The Xenix FAQ

Part 2 will follow with the description of my experience I made with the XENIX development environment.

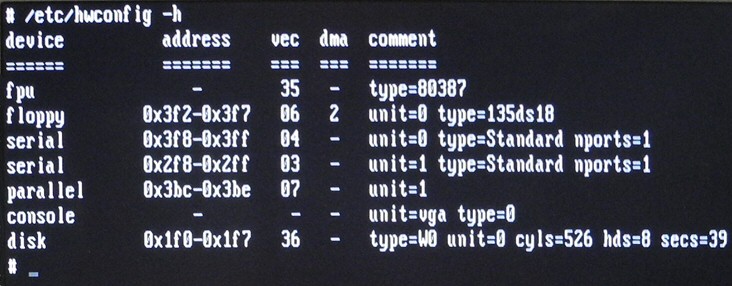
P.S.: Xenix 386 2.3.4a supports MFM, IDE, RLL and also SCSI harddisk drives, so it also works in a virtual environment as well as on a real system. I've read it will not work with a Pentium machine, so please give me a feedback if you was able to install it on a newer system than my 486. This is my hardware configuration I used (80MB IDE drive):


P.P.S.: Beware of the Y2K bug in Xenix. Look for xnx427d.Z in known internet search engines.
add comment ( 444 views )   |  permalink   |  related link   |   ( 3 / 3532 )
How to figure out structure / disk parameter of an unknown CP/M floppy disk ? 
Tuesday, May 20, 2014, 06:30 PM
Posted by Administrator

Meanwhile - more than only one time - I got mails with questions about unknown CP/M floppy formats. Often computer are mentioned, which are used in industry only, or names from SBC / self made systems were telled.

So how to figure out structure or disk parameter of a floppy disk of an unknown system ?

If you have access to that unknown system, take a look at the build-in floppy drive - at least you will get the model/type of the drive itself, and then you know how many tracks are used, e.g. if a TEAC FD55FV is used, usually 80 tracks is the number of tracks.
Also, you know then it's a double density drive, and MFM coding was used.

If you don't have access to the original system, just the floppy media, it's much more difficult. You can use devices like Kryoflux or SuperCard Pro, this is the most easy way.
If you own a PC with installed MS-DOS (not Windows!) and at least a floppy drive with the same physical media dimensions (e.g. 5.25 inch), you can use ANADISK.
ANADISK can help to get the needed disk definitions (e.g. Skew, DPB values etc.) for 22DISK, which can be referred as a companion software of ANADISK. To alter the definition file of 22DISK, you have to decompile them first (with STRIPIDX).

Entries look like this one:

BEGIN A1 Generic CP/M - SSSD 8"
DENSITY FM ,HIGH CYLINDERS 77 SIDES 1 SECTORS 26,128
SIDE1 0 1,7,13,19,25,5,11,17,23,3,9,15,21,2,8,14,20,26,6,12,18,24,4,10,16,22
BSH 3 BLM 7 EXM 0 DSM 242 DRM 63 AL0 0C0H AL1 0 OFS 2
END

(Note: 77 tracks were only used by 8" floppy disk drives)

A complete description of these parameter can be found in 22DISK documentation (usually included in the programs ZIP file).

You can take a look into a very helpful newsgroup message also:
https://groups.google.com/d/msg/comp.os.cpm/GxQ2ad3aHdI/nt8em8edXYQJ

You have to have an understanding about the disk structure of CP/M disks in general.
Take a look inside the CP/M Alteration Guide, Chapter 6.11 (see related link also).

After figuring out the parameters (these parameters typically are very often more or less similar or equal to already existing entries !), you can re-compile the disk definition file back to a binary file (with GENINDEX).
If all parameter were correct, you can use CTOD or DTOC for transfering single files, or you can use the main program to copy a whole floppy disk.


Alternatively you can try IMDA, which is part of Dave Dunfield's ImageDisk program package, which can be found at http://www.classiccmp.org/dunfield/img/index.htm

For more infos about transfer CP/M files, take a look also at my "Transfer page".
add comment ( 229 views )   |  permalink   |  related link   |   ( 3 / 1513 )
A new ISA 8-Bit SCSI Controller... a Trantor T130B - but new problems too 
Tuesday, May 6, 2014, 08:20 PM
Posted by Administrator
Looking still around for a better SCSI Controller which fits in my original IBM PC/XT, I found a Trantor T130B, which should be more suitable for a generic usage, because it comes with an external SCSI connector, and more important, there is an ASPI driver for DOS existing.

Unfortunately there were two versions sold, some with, and some without a BIOS ROM.
I got one without a BIOS ROM, but I own an EPROM burner, so no problem yet.
But I then I discovered there is another empty socket U6 on the card, a 20 pin DIL one.
I figured out that there is also a PAL on the "boot-capable" version, but my version didn't have one. Fortunately some other smart PC owners already figured it out, what content the PAL chip has to have. See http://www.vintage-computer.com/vcforum ... AL-Part-13 for a thirdteen pages entry which describes what was done for figuring it out.
So I am confident it will be a booting harddisk soon, I only have to get the "burned" PAL.
Because PALs aren't reprogrammable, i choosed to take a GAL 16V8 instead of a PAL16L8.

Stay tuned for an update ... hopefully all things will go well.

Related link for a short description of that card.

Added later: I got a boot ROM message from the controller, but the controller itself does not recognize at boot time any hard drive. Seems I didn't programmed the GAL correct, or, also possible, the PAL file from the vintage-computer.com forum does not fit.
add comment ( 240 views )   |  permalink   |  related link   |   ( 3 / 1433 )
Sega Dreamcast + VGA output ... possible for ALL games, but with a trick 
Saturday, April 19, 2014, 03:15 PM
Posted by Administrator
Recently I bought a Sega Dreamcast console, playing with it is *VERY* nice.

Especially Daytona USA 2001 is my favorite racing game, which remember me of the good old times ;-)
But the video output with the antenna / RF cable is NOT satisfying. So I also bought a DC VGA converter, which produces a very crisp picture on a VGA screen (you would love it, too).
Unfortunately some games (e.g. Soul Calibur) do not like to be shown on a VGA screen:

This is an artificial limit, because the games do run technically, regardless what video output is choosen. So I played a bit with that switch on the VGA converter box, and guess what I've figured out...

As you can see, even Soul Calibur runs with VGA.

How ? Power off the Dreamcast console and switch off the loud speakers.
The VGA converter box switch should be at position "TV".

Now power on the Dreamcast, and LISTEN the noise of the CD drive.
You will notice nothing on screen, screen is (still) black.
First 1-2 seconds, drive is starting to spin, making a noise without the stepper head of the CD drive itself. After another 2-3 seconds, the drive making it's first stepper noise, loading something from the GD-/CD-ROM itself.

After this first game loading noise is gone, switch the VGA converter box back to "PC".
You will notice a screen/the game is shown on your VGA screen again :-)

So switch it to TV, wait until the video output check is made (a few seconds), then just switch it back to PC. Mission completed.
add comment ( 301 views )   |  permalink   |  related link   |   ( 3 / 1513 )

<<First <Back | 23 | 24 | 25 | 26 | 27 | 28 | 29 | 30 | 31 | 32 | Next> Last>>