Peter's z80.eu site blog
Search 

Please read ! 
If NO IMAGES will be shown, use www.z80.eu/blog instead of blog.z80.eu

Please note also - THIS BLOG ENDS HERE WITH THE LAST ENTRY FROM NOVEMBER 9th 2021.

I have prepared a new blog with wordpress at https://vintagecomputing.info !!!

Thank you.
Expirience made with Genius G840 IC Programmer (from stg51.com) 
Saturday, July 19, 2014, 12:00 PM
Posted by Administrator
A few weeks ago, I obtained a Trantor T130 SCSI ISA 8-Bit controller, and I realized I had to burn an EPROM and also a PAL/GAL chip (both were missing), see >this< blog entry also.
I burned successfully the ROM content, this was easy.
Now I tried to burn also GAL chip, but I run into problems - I guess the chinese programmer can't interpret some JEDEC files or there is a problem with the JEDEC file itself.
Everytime I load the JEDEC file (download from >a vintage-computer blog entry<, included in the attached T130B.ZIP), I see no changes in the Data View window.

I tried to convert the JEDEC file into a binary one, using the JEDUTIL.EXE which is included in the MAME distribution. I got a file with 279 bytes - seems to be wrong also.

Also, I was unsure about the sum of fuses for a 16V8 GAL, but (meanwhile) this seems to be not the problem. I tried also another JEDEC file from http://www.princeton.edu/~mae412/HANDOU ... /EMP21.jed ... this worked, loading it shows also changed data in the data window!

This chinese programmer software (I got version 5.2 which seems to be the newest one) has an ugly user interface and the english translation was not really successful done. Also, some functions can't be used intuitively, e.g. to read a device, you have to choose "CONNECT" first (why not connect the device automatically when "read" is selected ?).
Also, the "programming sequence" let me think about it again.


I have to ask other users of these G540/G840 programmers for their expirience I guess...

See related link for the JEDEC file I can't use.

Added later:
>I have modified the non-working JEDEC file<, and as a result of it, I can load it into the programmer now. 2194 fuses seems to be correct, because these additional fuses (compared to 2048 fuses user data) are not used for normal data, instead, for managing content and special parameters.

I also figured out (again later) that the G840 programmer should not ENCRYPT it as a last step, otherwise a comparison with the loaded content (into buffer) will not work too.
add comment ( 260 views )   |  permalink   |  related link   |   ( 3 / 8665 )
Installing XENIX 386 on a real intel 486 PC Part 4 (cont'd with a 3Com503) 
Saturday, July 12, 2014, 06:53 PM
Posted by Administrator
After swapping the WD8013 card with a 3Com 3C503, I continued to install TCP/IP package.

You have to install STREAMS first - before TCP/IP, as usual with "custom" and "Add package" (Option '4'). It's a different serial/key combination compared to the TCP/IP package itself.

After you've added STREAMS, you can go on with TCP/IP Disk 1, start again "custom" and choose also "Add package" (Option '4'). After inserting all 3 Disks plus the TCP/IP maintance disk and entering again the serial/key combination (but now the one for TCP/IP), you've not finished it.

I read in a PDF document that also a SCO LLI Driver Disk (the hardware related part) was needed. You can find a version 3.0 of that LLI disk at ftp://ftp.sco.com/pub/EFS/efs120.Z (uncompress it with WINRAR for example, you will get a 1200KB (disk) tar file - copy it with doscp later from a 1.44MB DOS formatted floppy disk and rewrite it back with dd, like described in part 3 of my Xenix blog entry).

Unfortunately this LLI driver disk version 3.0 resulted in a version warning ("LLI should not be installed in any releases prior to 3.2.1." - not sure where to get a proper SCO LLI driver disk which fits for Xenix 2.3.4 ..... I WAS STUCK !


Looking for a "LLI driver disk" I found a bit later a hint, that XENIX 2.3.4 does not need and use a LLI driver disk ! I felt being framed from that above mentioned document.

So I looked for some help about using ifconfig with XENIX, and finally I found a really helpful page (here and later this one).
They mentioned to use mkdev wdn, but I looked at /usr/lib/mkdev and found the proper file was named "3comB". "mkdev 3comB" started the setup for the card and later on the kernel was rebuild also.
But 'ping' still generates 'ping: socket: Protocol not supported' .... bummer
Also, ifconfig still does not work - "ifconfig /dev/3comB0" says "invalid argument" ...

At the end I tried also "mkdev tcp" and that was the key for success !
With "mkdev tcp" you can setup your machines IP address as well as other important parameters. And after another reboot, even PING worked, and so also ifconfig 3comB0:


YES. FINALLY TCP/IP IS UP AND RUNNING WITH XENIX !!!!

If you google for "mkdev tcp", you will find several .doc files, which are located in a SCO driver directory and also existing are drivers there (e.g. ftp://ftparch.emu.edu.tr/Programs/Drivers/lan/EZ2000/SCOUNIX/ or http://download.modem-help.co.uk/mfcs-L ... e=#archive). So I guess it would be possible to run a NE2000 card also with XENIX.

Note: The related link below (a PDF at tenox.net) was NOT helpful. It describes a very different installation procedure for a later SCO UNIX version.
add comment ( 195 views )   |  permalink   |  related link   |   ( 3 / 2103 )
Installing XENIX 386 on a real intel 486 PC Part 4 (at least the prerequisites) 
Sunday, June 29, 2014, 11:00 PM
Posted by Administrator
May be you know already, that the "Streams and TCPIP" packages does support only very few network cards, a 3COM 3C501, 3C503, WD8003 (8 Bit ISA) and last but not least hopefully also a WD8013 (16 Bit ISA). No NE1000/NE2000 support (SCO list a Novell (Exelan) 205T - but never heard before from it until I read the below mentioned compatibility note), although I read a usenet article which describes success with a NE2000 compatible Longshine card. See also here for more NE2000 comments.
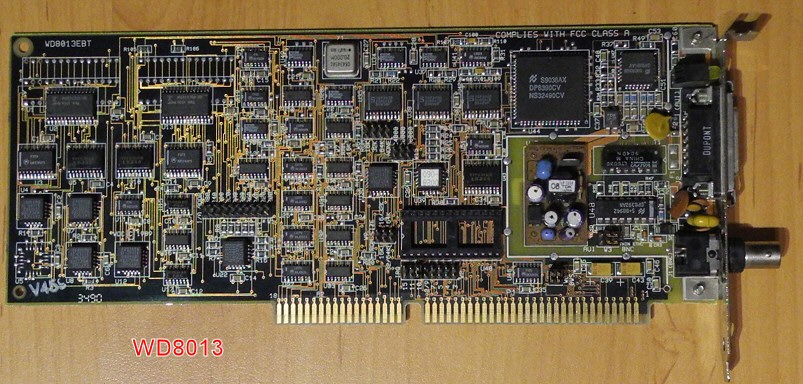
So you do not need only the 4 TCP/IP floppy disks (and one Streams floppy disk), but also compatible hardware. I was so happy to find a WD8013 a few weeks before, also because these network cards are meanwhile very rare.
But I was also surprised about the size of the card - it's a monster:

The related link below mentions h/w compatibility - described by SCO itself.

Added later:

These WD80x3 cards are crap. Unbelievable how many problems occur with the configuration.
May be the Trident VGA in my 486 is the reason, don't know.

So I inserted my WD8003E (because the WD8013 didn't run, I took the WD8003 for further tests) in my IBM PC/XT, also because my XT does NOT have memory above 9FFFFh.

The default settings for these cards is i/o 280h, irq 3, ram address D0000h.
But almost all PCs of that era could have a second serial port.
So I have a big problem:
IRQ 2 = already taken by the SCSI card.
IRQ 3 = already taken by COM2 port (I have one)
IRQ 4 = already taken by COM1 port
IRQ 5 = already taken by LPT2 (I have also one)
IRQ 6 = Floppy disk
IRQ 7 = already taken by LPT1

At this point I realized I couldn't test further because my XT has no free IRQ.
So I disabled my COM2 port first (IRQ 3 is free then).
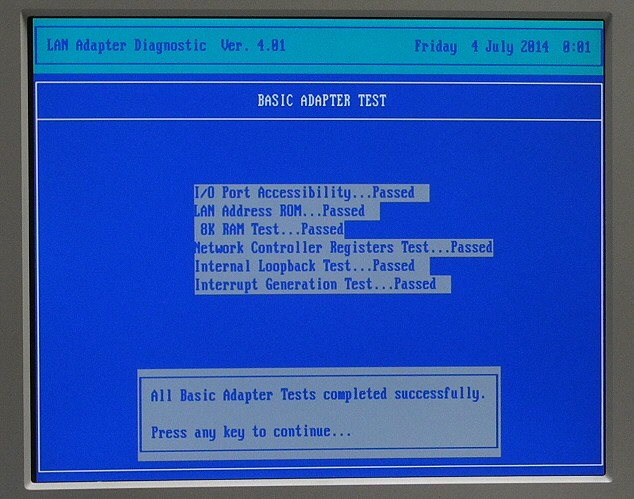
I was able to run DIAGNOSE with this result:

BUT. I was still not able to run EZSETUP.

At this point, I am out of any helpful idea.

So far I was also able to run the packet driver 8003pkdr.exe without errors.
I guess I will use the WD card with my XT, and continuing to test XENIX with my 3COM503.
May be there exist also an earlier (non SMC) WD8003 setup program, but I can't find it.
[this will be continued]
add comment ( 214 views )   |  permalink   |  related link   |   ( 3 / 1449 )
Installing XENIX 386 on a real intel 486 PC Part 3 
Sunday, June 29, 2014, 09:00 PM
Posted by Administrator
Before I try to install Streams and TCP/IP, let's try VP/IX.
I got three 1.2MB disk images, but to install it with my 1.44MB floppy drive in my 486-PC, I had to convert the disks first. How ? Easy if you already had installed XENIX.

1. Copy each 1.2MB disk image file onto a DOS formatted 1.44MB floppy disk media
2. Run XENIX and use doscp to copy the disk image files onto your harddisk
3. Use the dd command to transfer it back to a real floppy media:
dd if=vpixdsk1.img of=/dev/fd0 (or instead of "fd0" use "rfd0135ds18")
4. Do this for all three images
(as a result, you should get three 1.44MB installation disks)

Now type in 'custom' again, choose '4' (for additional packages) and if asked, insert the first of the three floppy disks. You should select 'ALL' as an option, a bit later you had to insert the other two disks also. When you typed in the serial number/activation successfully, it should go back to 'custom'. Just exit.

Now how to run VP/IX ? Easy if you know it. Just type in 'vpix' on console.
Even a BIOS is loaded, similar to modern virtual machine software.

Now you are able to type in DOS commands. 'VER' returns DOS 3.30.
Using ALT-F1, ALT-F2 and so on you can run DOS more than once... nice.
To exit VP/IX, type in 'vpixcmd quit' ... that's all.

Using Google there is almost nothing to find about VP/IX .... strange.

But next time I will tell you my expiriences with TCP/IP and XENIX, promised.
3 comments ( 322 views )   |  permalink   |  related link   |   ( 3 / 1504 )
Installing XENIX 386 on a real intel 486 PC Part 2 
Sunday, June 15, 2014, 09:00 PM
Posted by Administrator
Installing the XENIX 2.3.0d Development System isn't so hard.
Assuming you managed it to write six 1.44MByte floppy disk images back to real floppy disk media with success, you just have to enter 'custom' at the XENIX system prompt.
Then you have to choose '2' for Development System, '1' for installing one or more packages, and then 'ALL' for all packages. Be patient then, reading each disk will take a bit time.

Each disk contained a TAR file, which can be opened from any Windows machine with WINRAR also with ease (just open the image file of the floppy disk with WINRAR).

After all disks are processed, you have to enter the serial and activation code.
And last but not least, you have to decide what curses you want to use: termcap or terminfo based. Old skool people like me prefer termcap ;-)

After the system prompt reappeared, I tried to enter a small but famous test program.
But I could NOT enter the closing bracket '}' ... it's not available with my german keyboard. That's ugly, but because I had no time to figure out how to fix it, I just write the small text file in Windows, copied it to a floppy, and used 'doscp' to get the file into XENIX file system.

And it worked:

Remember - running the program without preceeding './' needs '.' to be added in PATH variable.
And without any cc option, the generated program is always named 'a.out'.

In one of the next parts, I will describe installing and using TCP/IP.

For a dev system manual, look at the related link below.

P.S.: I solved the problem with the german keyboard layout. You have to replace a file named 'keys' within the /usr/lib/keyboard directory with a modified version, then you have to run 'mapkey' one time. The modified 'keys' for my german keyboard can be downloaded >here<. If unsure, backup your original 'keys' file first before replacing it.
add comment ( 293 views )   |  permalink   |  related link   |   ( 3 / 11151 )

<<First <Back | 22 | 23 | 24 | 25 | 26 | 27 | 28 | 29 | 30 | 31 | Next> Last>>